ShopDreamUp AI ArtDreamUp
Deviation Actions


Description
ALRIGHTY!!!! I HAVE PERMISSION TO USE THIS PHOTO!!! IT'S NOT MINE, BUT I HAVE PERMISSION BY

TO USE IT!!!! NO ART THEFT!!!!!
So....I recently got Photoshop CS3 for Christmas, and I had yet to really understand some of the cool things you can really do.
I stumbled upon this video that showed eye tutorials for photoshop. I was really interested in it, and decided to put it to good use! Since, you know, I don't really get the tutorials already made for Photoshop...
I figured I'd jsut show you all my progress. Also, I want to be able to look back and see my development though time as I get older. It's good for colleges as well.")
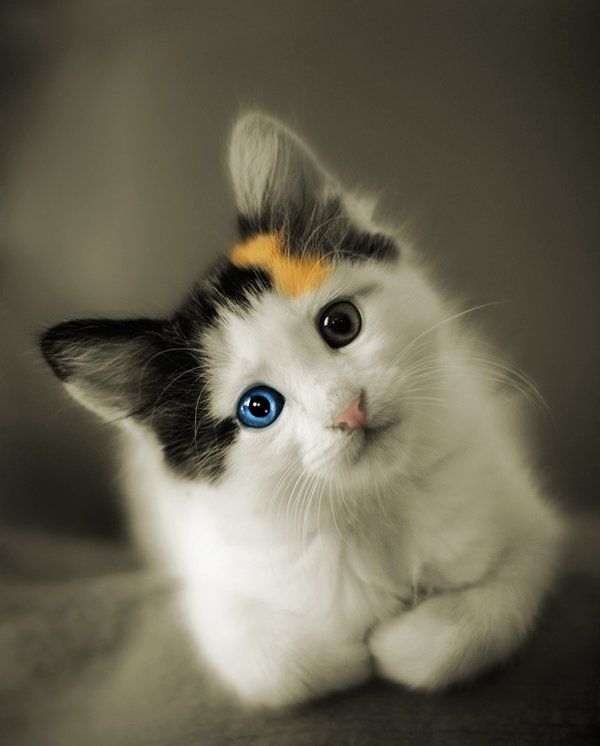
So here it is!
And now I'll explain my process. I don't know how to make a tutorial, so I'll just explain it right here!
I started off with the original picture by *[link]
The first thing I did was take my Pen Tool and set the option at the top to "paths".
I zoomed in on the eye to the left and clicked from point to point, making the shape of the eye and connecting it together to make a big, egg shaped circle...the shape of the cat's eye.
I next right clicked inside of the circle, and hit "make selection". You're going to see a box pop up, and inside it, you'll see a box you can type in next to the word "feather".
You're going to want to type in a "3", and hit okay.
Next, go to the Select menu, go to "modify", and hit "feather". Make sure the number in the box says 5. If it doesn't...change it.
Now, the circle around the eye will become a moving dotted line. So don't freak out if it does that. It's normal.
After that, you'll go to "image", and click on "adjustments", and go to "curves".
I wanted the eye's general color to be brighter, so I took the "RGB" line, and brought it slightly up and to the left.
Next, I clicked on the drop down box, and went to blue. *You can pick whatever color you want*. I brought the line up and to the left slightly. Then, I went to the red, and brought it down and to the right slightly. It makes the blue brighter. When you're done, click "ok".
Okay, the hard part is finished. Now, go over and make a new layer.
When you're done doing that, click on your "Dodge" tool. Go over and zoom in to the eye a bit closer. You're going to want to click and hold the mouse, and circle the pupil a few times. It'll make the halo around the pupil brighter.
When you're done, go back to your dodge tool and change it to "burn".
Go back to the eye, and click and hold. Drag it around the outer edge of the eye, giving it darkness and depth.
Lastly, go to your marquee tool, and make it an "elliptical marquee". Go back down to your eye, and drag your mouse to make a circle big enough to encompass the pupil. Place it right over the pupil when you're done. Now, make sure your background color over to the right in your color section is black. When that's done, hit "Ctrl + Del" *control and delete*, and that will make the pupil completely black. This helps the eye stand out as well.
One more thing- you need natural shines. Now make sure both colors are white, and take your tool and make it a paint brush. Make your size small and decent. The mode should be "normal", and the hardness around 50%. Make shines where you wish on the pupil, and you're done!
I used the exact same methods for the orange fur spot and the nose, minus the shines and the marquee section. ^^
HOPE YOU LIKE IT!
TO USE IT!!!! NO ART THEFT!!!!!
So....I recently got Photoshop CS3 for Christmas, and I had yet to really understand some of the cool things you can really do.
I stumbled upon this video that showed eye tutorials for photoshop. I was really interested in it, and decided to put it to good use! Since, you know, I don't really get the tutorials already made for Photoshop...
I figured I'd jsut show you all my progress. Also, I want to be able to look back and see my development though time as I get older. It's good for colleges as well.
So here it is!
And now I'll explain my process. I don't know how to make a tutorial, so I'll just explain it right here!
I started off with the original picture by
*[link]The first thing I did was take my Pen Tool and set the option at the top to "paths".
I zoomed in on the eye to the left and clicked from point to point, making the shape of the eye and connecting it together to make a big, egg shaped circle...the shape of the cat's eye.
I next right clicked inside of the circle, and hit "make selection". You're going to see a box pop up, and inside it, you'll see a box you can type in next to the word "feather".
You're going to want to type in a "3", and hit okay.
Next, go to the Select menu, go to "modify", and hit "feather". Make sure the number in the box says 5. If it doesn't...change it.
Now, the circle around the eye will become a moving dotted line. So don't freak out if it does that. It's normal.
After that, you'll go to "image", and click on "adjustments", and go to "curves".
I wanted the eye's general color to be brighter, so I took the "RGB" line, and brought it slightly up and to the left.
Next, I clicked on the drop down box, and went to blue. *You can pick whatever color you want*. I brought the line up and to the left slightly. Then, I went to the red, and brought it down and to the right slightly. It makes the blue brighter. When you're done, click "ok".
Okay, the hard part is finished. Now, go over and make a new layer.
When you're done doing that, click on your "Dodge" tool. Go over and zoom in to the eye a bit closer. You're going to want to click and hold the mouse, and circle the pupil a few times. It'll make the halo around the pupil brighter.
When you're done, go back to your dodge tool and change it to "burn".
Go back to the eye, and click and hold. Drag it around the outer edge of the eye, giving it darkness and depth.
Lastly, go to your marquee tool, and make it an "elliptical marquee". Go back down to your eye, and drag your mouse to make a circle big enough to encompass the pupil. Place it right over the pupil when you're done. Now, make sure your background color over to the right in your color section is black. When that's done, hit "Ctrl + Del" *control and delete*, and that will make the pupil completely black. This helps the eye stand out as well.
One more thing- you need natural shines. Now make sure both colors are white, and take your tool and make it a paint brush. Make your size small and decent. The mode should be "normal", and the hardness around 50%. Make shines where you wish on the pupil, and you're done!
I used the exact same methods for the orange fur spot and the nose, minus the shines and the marquee section. ^^
HOPE YOU LIKE IT!
Image size
600x746px 59.89 KB
© 2009 - 2024 xo-KisshuLuvr-ox
Comments12
Join the community to add your comment. Already a deviant? Log In
O(∩_∩)O~
好可爱呀...
好可爱呀...